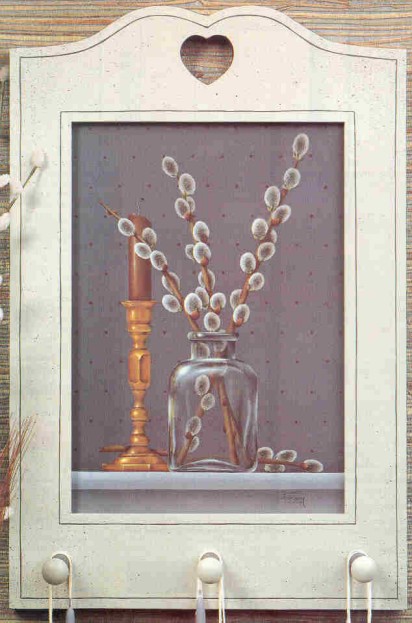
Brass Candlestick with Pussy Willows
![]()
W
hile on a walk in New England last spring, I kept noticing how beautiful the pussy willows were in the sunshine. These fuzzy flowers inspired me to paint this simple still life. You’ll need only a few basic color-mixing and blending techniques to capture the realism of this design. And when the paint has dried, use the rack for hanging hats, children’s coats or candles.
PALETTE – Deco Art Americana Acrylic Paint
| Antique Green Bittersweet Chocolate Burnt Sienna Dove Grey French Blue Grey Green Mist Hauser Lt. Green |
Honey Brown Lamp Black Light Cinnamon Marigold Neutral Grey Primary Yellow Raw Sienna |
Silver Sage Green Soft Black Terra Cotta Titanium White Yellow Light |
PREPARATION
Step 1: To begin, basecoat your masonite panel with a mixture of French Blue Grey + Lamp Black 2:1.
Step 2: Using the pattern, transfer the top line of the table onto your panel. Basecoat below the table line with French Grey Blue + Neutral Grey 2:1.
Step 3: Now, transfer the bottom edge of the table top onto the panel. Lighten the French Grey Blue + Neutral Grey mix with Titanium White and side load a ľ"flat with this mix. With the light side of the brush toward the upper edge of the table, paint the top edge of the table. Next, side load your brush with the French Blue Grey + Lamp Black 2:1 mixture and shade the area beneath the lower table line.
Step 4: The wallpaper background is created with transparent dots placed in horizontal lines across the panel. Using Burnt Sienna, paint the dots on the panel with the handle of a medium sized brush. Each row of dots should be one inch above the other, and each dot should be one inch form the dot next to it. Make sure, however, that you stagger each row of dots so that they create a triangular design. (Don’t stack the dots one above the other.)
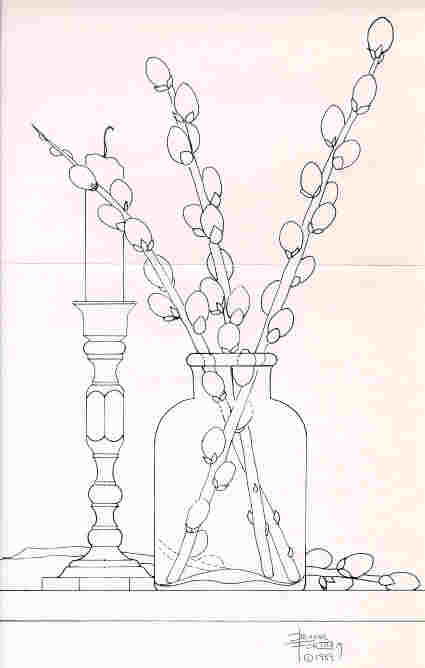
Step 5: Transfer the rest of the design onto the surface. Trace only the outline of the candlestick, however, as you’ll add the inside detail lines later.
PAINTING INSTRUCTIONS
Candle
Step 1: Begin painting by base coating the candle with Burnt Sienna
Step 2: Side load your large, flat brush with Bittersweet Chocolate + Burnt Sienna 2:1 and use it to shade the right side of the candle and a small portion of the left. Then, brush over the shadows again as indicated in the Shadow Placement Diagram with a side loaded brush of Bittersweet Chocolate.
Step 3: Paint the highlight on the left side of the candle about Ľ" from the edge with what I call a "back-to-back" side load of Terra Cotta. To do this, first dampen your surface lightly and evenly with water, then side load your brush. With the loaded side of the brush against the center of the highlight area, apply your paint with pat-pulling motions of the brush. Now flip the brush over so that the loaded edge is facing the previously applied color and finish side loading the highlight. After doing this you will have the lightest value in the center of the highlight with the value fading away to either side. When this first highlight is dry, drop a brush size and side load with Honey Brown and reinforce the highlight, keeping this lighter value in a smaller area.
Candlewick
Begin the wick by painting it with Lamp Black. Next, using Neutral Grey, paint the inside of the wick with short strokes that follow the curve. Remember to leave a bit of black showing between each stroke and at the edges so the wick looks like a twisted piece of string. Leave the tip black and highlight the left sides of the Neutral Grey strokes with Dove Grey.
Candlestick
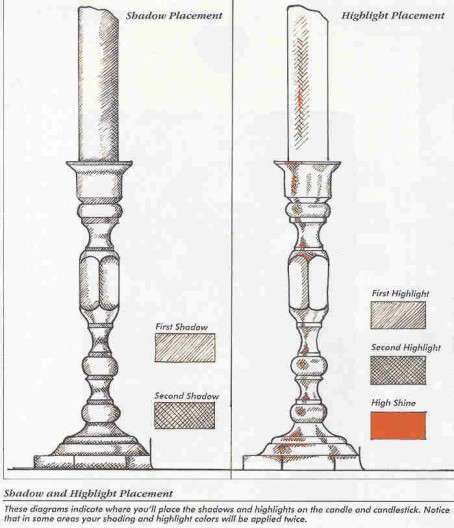
Step1: Base coat the candlestick with Raw Sienna. Let dry, then transfer the inside detail lines from your pattern.
Step 2: To establish the shadows on the candlestick, shade the areas indicated on the Shadow Placement diagram with a side loaded brush of Raw Sienna + a trace of Soft Black (about 10:1). Next, go over your first shadow with a side loaded brush of Raw Sienna + Soft Black 2:1 keeping this darker value in a smaller area. Also, use the RS + SB 2:1 mix to "wash" over the thin, horizontal bands that separate the candlestick sections.
Step 3: Side load your brush with Marigold + Raw Sienna 1:1 and highlight the appropriate areas referring to the Highlight Placement Diagram. Make this area even lighter by painting over it again with Marigold, keeping this in a smaller area. (You may find that you have to side load in the back-to-back manner to achieve the right effect.)
Step 4: Side load your brush with Yellow Light + Primary Yellow 2:1 and apply the color in the "high shine" or very bright highlighted areas of both the candle and the candlestick. Use a liner brush to apply a touch of Titanium White in the centers of these areas.
Pussy Willow Flowers, Stems and Leaves
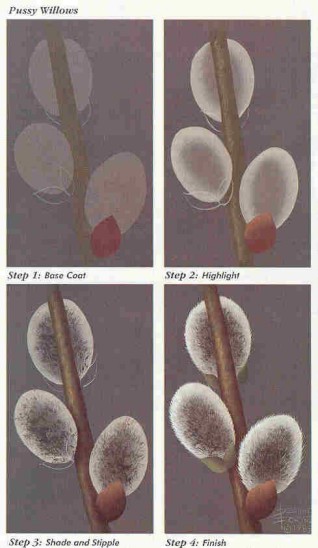
Step 1: Now begin to paint the pussy willows by base coating the stems with Antique Green and the pussy willows with Neutral Grey. Base coat the brown casings at the base of each flower with Light Cinnamon.
Step 2: Next, highlight the center of each stem by side loading your brush with Yellow Ochre + Antique Green 2:1. To establish texture in the branch, use short, choppy strokes of paint. Paint around the edges of each pussy willow with a side loaded brush of Neutral Grey + Dove Grey 1:1. Highlight the tip of each casing with Marigold + Raw Sienna 1:1.
Step 3: Now, shade the right side of each stem and the edge of the left side with Bittersweet Chocolate + Antique Green 4:1. Stipple the center of the pussy willows with a deerfoot stippler using a mix of Neutral Grey + Loft Black + Lamp Black 2:1:1. Now shade the base of each casing first with Bittersweet Chocolate + Burnt Sienna 2:1 and last with Bittersweet Chocolate.
Step 4: Side load your brush with Bittersweet Chocolate and go over the shading on the right side of the stems. Then with a fine liner and Dove Grey, paint short, fine lines around the outside of each pussy willow, lining from the center outward to soften the edges and give the pussy willows a "fuzzy" look. Highlight the left side of just a few of the pussy willows with Titanium White lines. Paint the small green leaves at the base of some of the pussy willows by double loading a #4 filbert with a medium green (Hauser Lt. Green + Bittersweet Chocolate 3:1) and a dark green (Bittersweet Chocolate + Antique Green + Lamp Black 4:2:1). The lighter side should be on the left.
Glass Jar
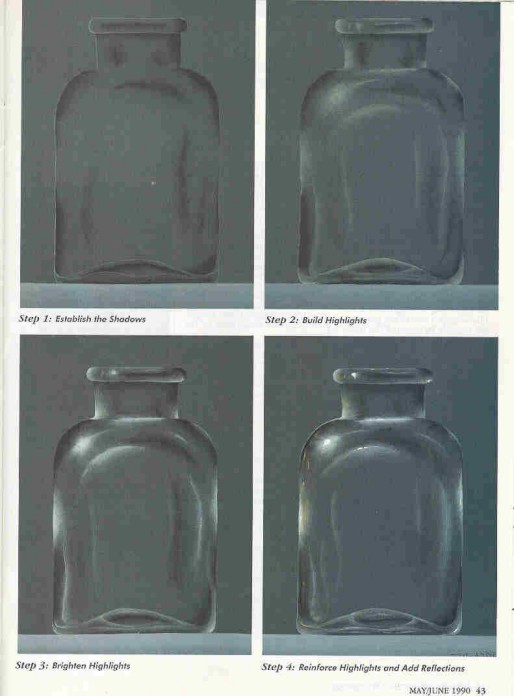
Step 1: To give the stem and pussy willow sections in the jar a glasses-in look, paint over them with a very thin wash of your blue background color. Next, establish the shadows on the jar with very transparent, side loaded washes of Lamp Black. (It’s very important to keep these shadows very transparent.)
Step 2: Establish the shine areas on the jar by side loading your brush with a mix of Green Mist + Neutral Grey 1:1. Refer to the glass illustration for the proper placement of your shines.
Step 3: Build up the shines by going over these areas once more with Silver Sage Green + Titanium White 1:1.
Step 4: Paint the brightest shine areas with a liner brush and Titanium White. As you do this, keep in mind that the left side of the jar is much brighter than the right because it is closer to the light source. Finally, add the candlestick reflections with a brush side loaded with Marigold + Raw Sienna 1:1.
Thanks to the Decorative Artists Workbook for permission to reprint this article.